Board and Batten Tutorial: How To Install


I’ve gone a bit batty for board and batten …
 (2)")
… truth be told, I’ve really gone much, much more batty than a mere ‘bit’ for this amazing board and batten wall treatment. And, yes, I’m late to this particular home diy party. What else is new?
I love this wall treatment so much that after my husband and I installed it in the entry (you can see the amazing before and after here) — by hand with old fashioned hammers and nails — I ran out to Home Depot and purchased a nail gun of my very own. Because I will be installing more board and batten …
EVERYWHERE …
 (2)")
I love how it looks like it’s been here forever.
 (2)")
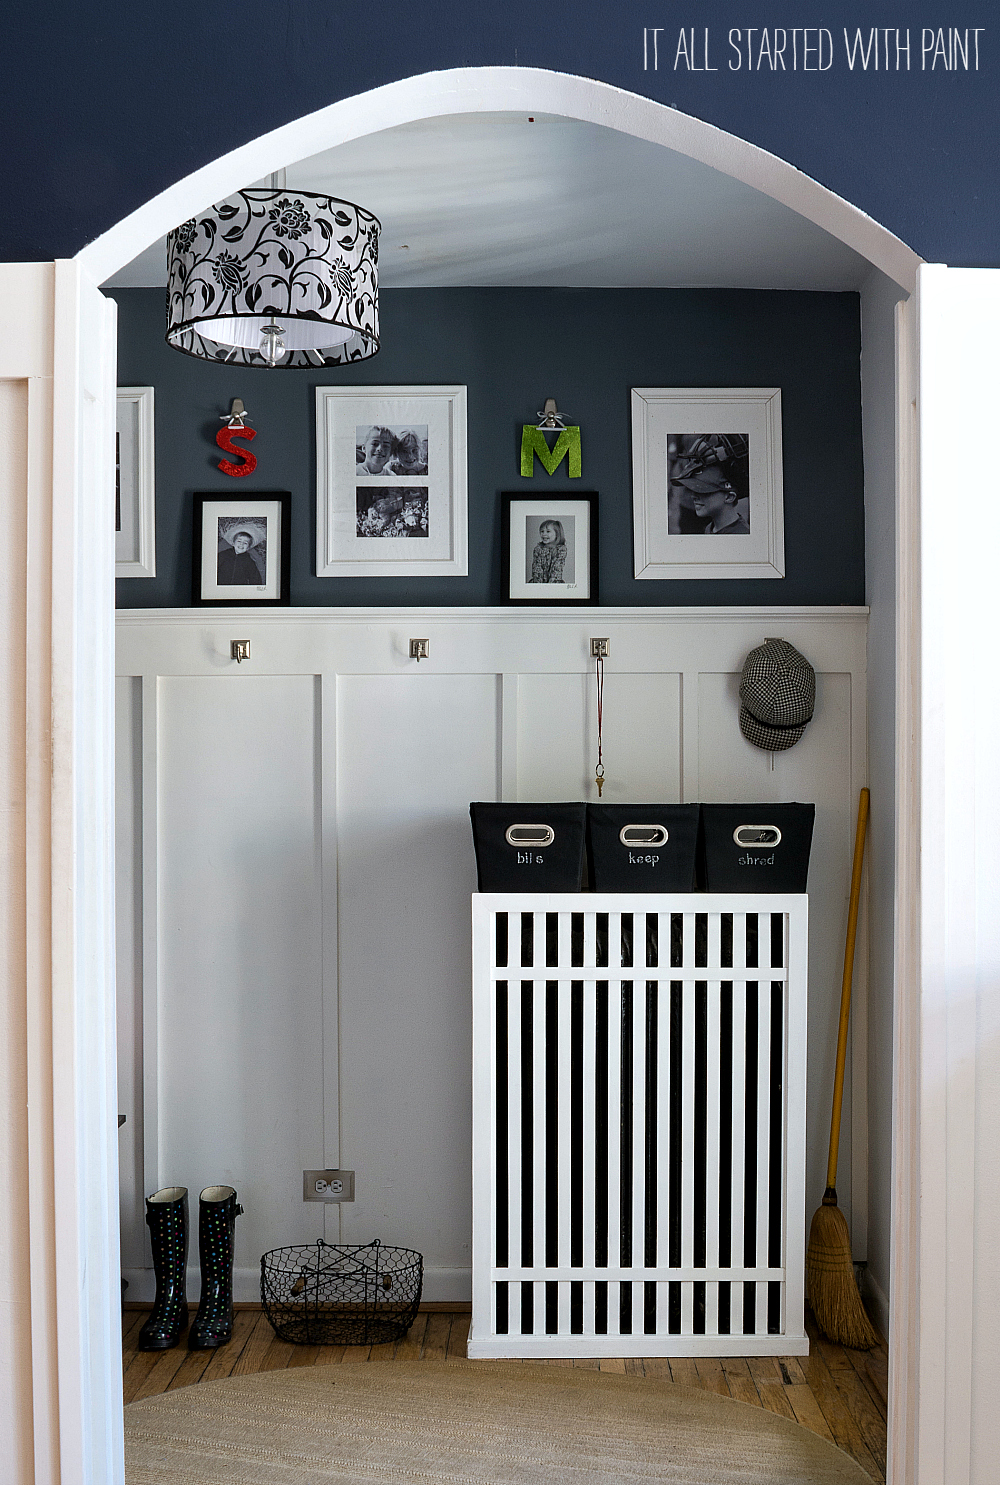
And I love how the board and batten wall treatment is the perfect backdrop for my other love … hooks.
 (2)")
How To Install Board and Batten Wall Treatment
Now on to the promised board and batten tutorial (though, quite honestly, you can’t swing a proverbial dead cat in the diy blogworld without hitting a board & batten tutorial). The key to making the process run smoothly …
… and not freak out my husband who is not a diy handy dude (though he does wash a mean load of laundry) …
… was advance prep and planning.
I started here at Centsational Girl’s tutorial and then followed all of the links she included in her post.
Unlike Centsational Girl, I decided against trying to install panels on the wall. My walls are smooth drywall so I just nailed the vertical and horizontal boards to the wall, caulked like a crazy woman, and painted it all a high gloss white. In the end, you can’t tell the difference.
I started by determining how high on the wall I wanted the molding to be … but I had to work around this odd little window …

So I grabbed some painter’s tape and a level and starting taping out a pattern that looked pleasing to the eye. In the end, I took the board and batten molding about 2/3rd’s of the way up the wall, with the vertical ‘battens’ approximately 16 inches apart. I fudged here and there to make it fit. I leveled the horizontal and vertical taped lines as I went.

Then I painted it out with primer and removed the tape … and was left with a template of where to place the boards …

I measured all the vertical and horizontal lines once, twice … and then once and twice again … and jotted down all my measurements.
Then (this is a very important step ladies) I took a shower, styled my hair, put on make up, rummaged through my wardrobe for something without paint and glue stains, grabbed my list of measurements, and went to the lumber yard at Menards. A gentleman who worked there very kindly made all my cuts for me … and didn’t charge me a cent 
I use primed mdf … I’m all for cutting out a few steps of sanding and priming. Here are the materials I used:


I also picked up …


… a box of 2 1/2” hardened trim nails …

… yea, that stuff is never coming off …
… and grabbed this $15 miter box on my way out.

My lumber came in just under $40.00.
Plan A included borrowing my next door neighbor’s nail gun. No such luck. He couldn’t find it.
Plan B included a skeptical husband, two hammers, and a box of nails.
If you, too, will be employing this low-tech board and batten installation technique, may I recommend that you hammer the nails partially into the boards first before attempting to put them on the wall. Then you don’t have to worry about holding the board and holding the nail and holding the hammer and holding the level …
… see how this could be problematic?
Oh and don’t do this step on your hardwood floors because sometimes you … or your husband … may get a bit overenthusiastic and hammer that nail right through that board and make a few nail holes in the hardwood.
Before any hammering of nails, I did a quick dry fit …our 115 year old home is neither level nor square … and then numbered the wall and the boards so I would know which ones went where.
I also used a stud finder to try to find studs, but since (a) my house is old and (b) this is an exterior wall, I was finding studs all over the place. I marked them out as best I could.
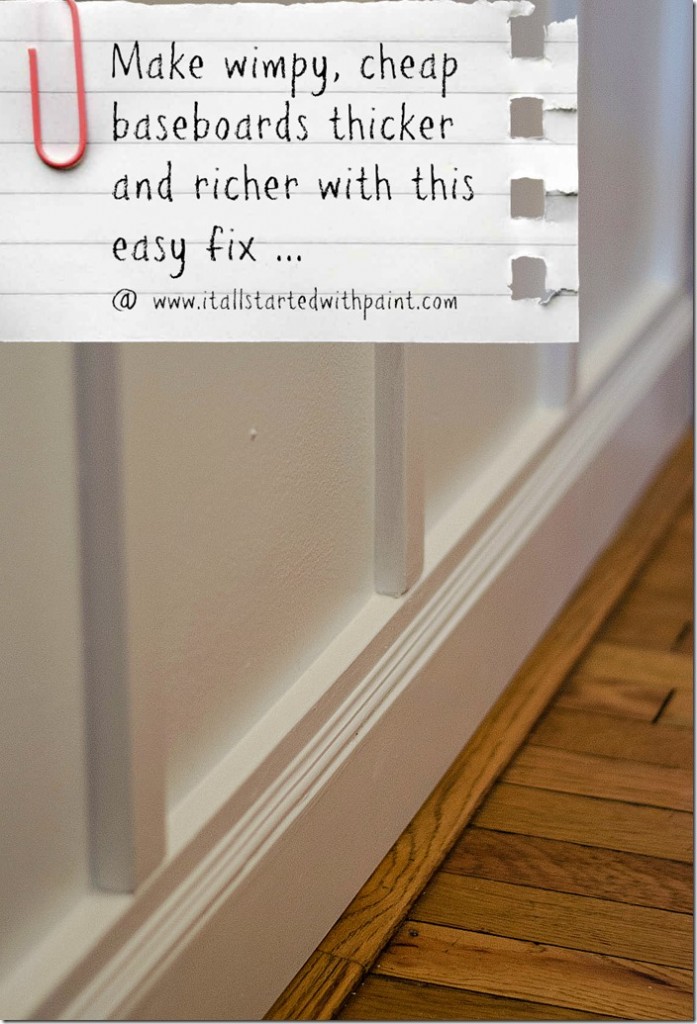
Finally, some people remove and replace their baseboards with a 1 x 4 so that the “batten” of the board and batten will sit flush on top of it.
I didn’t bother. And it doesn’t bother me … not one bit.
 (2)")
One final step: We slathered liquid nails on the back of each board before nailing to the walls. Did I mention that these boards will never, ever be removed from the walls without causing serious damage?
After three hours of leveling and banging and leveling and banging …. and on and on … all was attached. My husband countersunk the nail holes and I followed behind with spackle.
Then the caulking began. This is a long and messy process … but so worth the end results!
Three coats of semi-gloss BM Bright White later, we added hooks, mail sorter bins and a few accessories …
 (3) - Copy")
![entrylight[14]](http://lh3.ggpht.com/-9tAjrmlfWw0/TxUOubXEhII/AAAAAAAAHNs/tiNFQa55ozM/s1600-h/entrylight%25255B14%25255D%25255B4%25255D.jpg "entrylight[14]")
 (2) (550x413)")
This is officially my favorite room in the house. Now if I could just figure out how to fit our bed in here …
")
PIN IT!
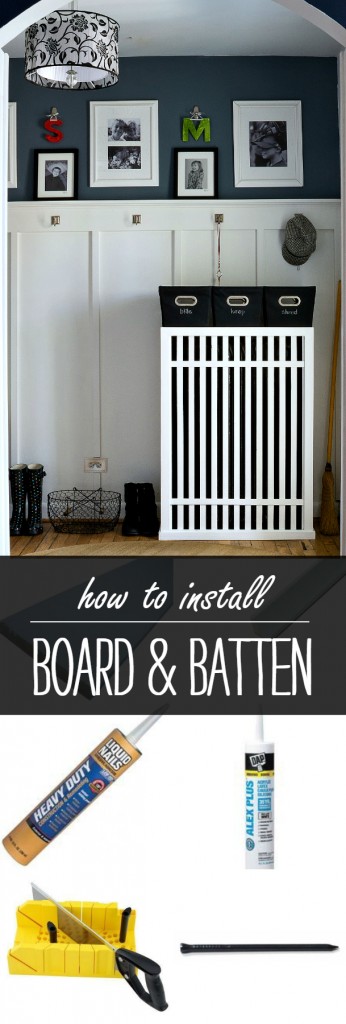
Board and Batten Tutorial
You Might Also Like:

How To Add Height To Kitchen Cabinets
This looks beautiful. I love it!
That looks great! I love the bills, keep, shred bins to. Perfect spot.
Beautiful!
Thanks Jean. I hope it comes in handy as you tackle your board & batten “Impossibilities” challenge …
Wow! I LOVE every little detail of your new space and I am now the newest follower of your blog. Both are so cute!
Hi Linda, thought I would let you know, I have done a post on two shelves I put up in the lounge – with a teeny weeny bit of help !
http://justpaintitwhite.blogspot.com/2012/01/floating-shelves.html
Now I just have another 10 to go !!!
Hoping to do panelling in my hall one day.
So much inspiration, so little time !
I really want to do this in my house….just can’t decide where. I love what you did!
I am your newest follower.
Thank you Helen!
I love the results..beautiful..this helps me muster up my own courage to put up b/b in my home..I’m dying for the look and I even own a nail gun!! What’s stopping me?? thanks for the courage!
Julie
Too cute!
“One skeptical husband…”
Thanks for adding me to your list of Chi bloggers
~ Dana
Cooking at Cafe D
Looks amazing! I wanna do this! I’m adding it to my never-ending DIY wish list. I love your mail sorting center too.
Don’t you worry, I am batty for this too! Looks beautiful! I’d love paneling like that in my kitchen!
Cheers,
Jessica
Looks fantastic good on you, great job
That is gorgeous!! Well done girl – I want to do mine now! Love all of it, the colors you used to decorate it, and you photography is awesome too! You are growing as a blogger by leaps and bounds!
I love this! Your space looks amazing!
Debbie
This space is beautiful! So jealous that you have a wonderful foyer to do this in! Also, love your blog name and the “our home, my canvas”.
Visiting from toddindsey.com
I think I would go batty installing my own board and batten! You are a true DIYer! It looks fab and can’t wait to see it “everywhere”! Now, stop talking and get to painting that bedroom – the challenge reveal is just around the corner!
Kelly
Update of the process…
http://adventuresofourfami-ly.blogspot.com/2012/01/i-think-i-can-i-think-i-can.html
Sarah
SIMPLY BEAUTIFUL!!! I’m visiting from Handy Man, Crafty Woman party…thanks for the detailed tutorial … LOVE the tip about shower, makeup, etc and heading to Menards to get the boards cut for free! I’ll definitely remember that one! hee hee!
All the best!
That is what I call “the perfect use of space”… the entire family can come in and drop off their coats and boots! I just love the grey paint on the wall!
Great Job!!!
Sandy
Gorgeous my friend, thanks for sharing the diy!
XO
Kristin
Awesome job! I absolutely love the space! Thanks so much for linking up today!!
Looks REALLY great, with a great tutorial! I just pinned it for me to bookmark when we move into our new house in 4 weeks! Thanks!
This comment has been removed by the author.
This has been on my project list for a long time now and every time I see it I just want to do it right away! It looks really good and I’m sure I would also be tempted to do it everywhere!
This is totally beautiful! I love what you’ve done with this room. We’re currently thinking about wainscoting for our dining room – not sure yet what style is going to work best for us, but we need some visual interest below our Central American artwork!
Found you over on HoH and this project caught my eye. If you’d like to submit this to our first DIY Link It Up party on OPC, we’d love to have you (runs through Monday)
Wow! Gorgeous! Awesome tutorial too!
Love.Love.Love it! I really want to attempt this in our master bathroom, but am a little intimidated! Thanks for the encouragement! I am enjoying your blog for the first time! Hope on over when you get a chance!
fabulous. bravo!
visiting via charm of home and invite you to my giveaway here:
http://hellolovelyinc.blogspot.com/2012/01/something-old-something-new-giveaway.html
smiles to you.
michele
You did a fabulous job!
Holly
This turned out beautifully. Everything is wonderful–the board & batten, the pendant light, the bench–everything.
Beautiful! Thank you for sharing your lovely project at Potpourri Friday!
The end result is so gorgeous!! I would love to do something like this one day
Love board and batten- great job on yours!! Thanks for sharing at Feathered Nest Friday!
Love it! What is the color above it?
I love this post! We are going to be doing this technique in our mudroom…so I have been reading alot of blog post tutorials on it. Yours, in my opinion is the very best I have seen. The detailed pictures…right down to the pictures of the wood you used…appreciated! I have never seen anyone else who taped it all off like that…and primed the wall…that is genius…and we will definitely be doing that! I am you newest follower!
Sharon
Stop by and visit sometime!
Love this! Pinning for future reference. =)
Looks great! I am curious how you worked with the uneven walls. We are running into the same problem. I’d love any tips you can offer.
Looks great! I am curious how you worked with the uneven walls. We are running into the same problem. I’d love any tips you can offer.
I really love this! I have a similar shade of grey in my kitchen/dining combo and have been wanting to do board and batten for a while! Thanks for the tutorial!!
I’ve been to your blog several times before, don’t know how I missed this post, but to make sure I stay on top of things, I’m now following you!
I’m co-hosting the link party with Lines Across and I would love it if you would stop by and share, if you haven’t already!
http://chase-thestar.blogspot.com/2012/05/co-hosting-cure-for-common-monday-linky.html
Hope to see you there!
Barbara @ Chase the Star
Please tell me you remember where you found the beautiful pendant lamp?!?!? I am craving it!
I love it! Should have know this was your house when I saw it linked up on Thrifty Chick
Totally cracked up when you got gussied up to go to Menards – I totally do this too when I need some free wood cuts ha! All your accessories really make the space, beautiful job as always! Kelly
Wow! Love the look. I used a similar wall treatment in my mudroom and hallway. Found you through Thrifty Decor Chic!
Hi Linda,
We’re looking at making a gallery hallway and using board and batten.
I knew right where to look for a tutorial – YOU!
(Pinning!
When I say that…I use my best Charlie Sheen voice in my head.)
Hey, so just wondering. Since your post has the phrase “finding studs,” are your “searched phrases” results leading to your blog pretty hilarious??
Hi! Your work is really beautiful! Hence u have me and my husband inspired. We just finished the measurements for the b and b and have placed all the painters tape. Would really love to know the paint color on the wall above the board and batten. Thanks and more power! ELAINE
I know I’m late to this post but I’m in love with the entry way color. Would love to know the paint or formula you used…
Thank you so much for your kind words! The color I used is Benjamin Moore Wolf Gray.
Good luck with your project!
Hi, I had to say that I absolutely love this. I also have wanted to do this at my house for a very, very long time! I LOVE what you have done. Do you have a printer friendly version? I so need to follow your directions. I am just no good at putting it all together the way you have on my own. I too have stairs in my foyer so I would love to get the directions and see the pics of how the stair wall was done. I tried to follow the link above this but the links are not working. Can you please email with back with response and information? Thank you so much for sharing all of this. You are an amazing and very talented person and truly wonderful!
I’ll email you a Word document with the tutorial so you can easily print out. I didn’t do the board and batten up the stairwell yet, but I’m sure you can find a tutorial for that project online. And thank you for your wonderful compliments!!!