Perhaps it’s the post-vacation vibe. Ten days of beach and sun and pool and sheer …. and utter … relaxation.
Ten days of hugs and kisses from my from mom and dad …
… hey, I’ll always be their little girl.
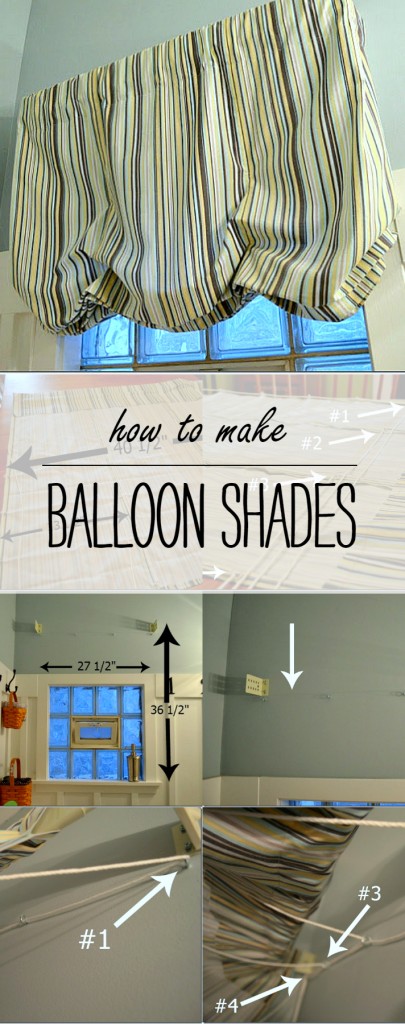
Ten days of pampering. Got to love the pampering. Tthough, these days, my husband and I try to pamper back too. And all this relaxation has me thinking of the relaxed balloon shade I made for the powder room remodel …

I don’t even have a link that I could share …

… because I made this up on my own. Okay, that’s not 100% true. My sister Janet walked me through the balloon shade how-to more than 20 years ago. And when I say “walked me through” I meant we sewed those very first balloon shades side-by-side … all four of them. We were literally drowning in fabric. So when I created the relaxed balloon shade for my powder room, I drew on those skills …

You see, most balloon shades are, well, much more ballooney. And I desired something closer to a Roman shade without all those hard straight lines. Mostly because making a Roman shade is my epic sewing fail of all time …
And before I launch into the dreaded tutorial, here’s a little secret …

I cheated the proportions of the room by hanging the shade higher than the sad little excuse of a glass block window that came with the room. And I didn’t bother to line the curtain because, quite frankly, there was no point. This window faces a cinderblock wall so I wasn’t concerned about the view from outside.
Step #1: Measure & Sew

Measure the length and width of the window … or, in my case, the length and width of the area I wanted the curtain to cover. For the length, I added about 10 inches or so for the bottom hem and the top pocket for the hardware.
For the width, I added 16 inches and then cut three equal length panels 14 1/2” wide …

… which gave me three finished panels at 13 1/2” after I gave the edges a 1/2” hem … and then sewed the three panels together using a 1/2” seam allowance. My full finished curtain width is 40 1/2.”

The curtain top was folded over and given a 4” pocket for the hardware. The bottom edge was folded over a 1/2” and hemmed as well. And don’t forget to iron … it’s a seamstresses best friend … and be sure to press open the seams and iron the top, bottom, and side hems for a nice crisp edge. Next up are the rings ….

Which were hand sewn on. I started at the bottom of the curtain panel and spaced them out about 6” each. You need to sew them on the left and right edges of the curtain, as well as in the center of the two seams where the panels were sewn together.

For my balloon shade, I needed 24 rings.
Step #2: Hanging
Start by attaching the hardware and eye hooks …

… I used a level to draw a straight line and then equally spaced out the eye hooks. Since I put mine into the drywall, I didn’t even need a drill. I just screwed them right in. Then I inserted the rod into the 4” top pocket …

… but it’s not ready to hang just yet. First we need to attach and thread the strings …

Tie the string onto the bottom ring of each row … and then feed it up …

… through all those little rings that were hand sewn on …
And when you hang the curtain, you start with the outer edge and feed the first string through all the eye hooks …

The next string to the left … #2 … will be fed through three eye hooks …

String #3 will be fed through two of the eye hooks … and string #4 will only be fed through one …

Then you just need to gather the strings together and play with them a bit as you pull up the curtain. When you like how it looks, braid the strings together …

… and attached to an eye hook on the side. And then you can just sit back, relax, …

… and enjoy the view. Phew. And now I need some rest and relaxation after writing up that dreaded put-off-for-five-months tutorial …
You Might Also Like:
That looks great. I’ve never done a balloon or roman shade, but might have to try it now. I always cheat and hang my window treatments higher too. It tricks me into thinking I’ve got nice big windows! Have a great, relaxing weekend! ~ Angie
Ho. ly. That was intense. I totally would have faked it and just pinned the darn thing into place. I’m so impressed that you made it pretty AND functional. You are my patience idol!
sewing and me go together like cats and dogs!! We don’t work out…in fact my high school home ec teacher just did it for me so I’d pass! The curtains in my house are courtousy of my momma!! So impressed!!! Way to go:) The curtains in my house are courtousy of my momma!!
Turned out beautiful! I have some roman shades in my future. I hope they turn out this great!
Wow, that looks great-but I wouldn’t even attempt that-it would be a hot mess-lol!
I do love your hooks and numbers-THAT I could handle 🙂
Susan
Beautiful tutorial and I love your blind, but I don’t think I’m cut out for sewing because I’d rather go clean the toilet than try to figure out how to put one of these together for myself. Sigh. My mom used to do all my sewing for me, I’m way too spoiled now!
xox
Nice job and great tutorial. You did a wonderful job on that blind- xo Diana
Thanks for the concise tutorial. Great! I love to sew. Do you? Take care, Linda
Wow. You’ve done it again.
Great tutorial friend! I love the look! I must admit I am still a little scared to try but you my have just motivated me! 🙂 glad you are back and that you had a wonderful time!!
Jaime
This is a scary project, but your tutorial is inspiring!! Love the look, Linda!
xo Heidi
PS– hope you’re settling back in after your vacay!
any tutorial that starts with ‘relax’ and has measurements that include ’10 inches or so’ is my kind of project. love this shade. 🙂
This is fantastic! You have so read my mind. I have been wanting to make something like this for my office, a relaxed version of Roman Shades because I know without even trying this would be an epic fail for me. Pinning this and hopefully by the year 2013 comes to a close, I will have made these. Great Work! -K
It looks great, and I’m glad you finally 😉 wrote the tutorial! Love it!
Debbie
I can’t sew – I am sad!
My windows are naked – they are embarrassed!
Love your hung-high window treatment.
Kelly
I’m avoiding editing one of Cane’s tutorial posts. For some reason, they just aren’t as fun as the others. So, I definitely appreciate this one. I think you’ve earned another vacation. 🙂
She who makes pillows should breeze through valance class.
~Bliss~
A fellow Chicago-an!!! Gesh, you can tell I’m not from her originally as I struggled on how to spell that.. DuH!!!! Anyway, I’m dropping by to say “hi”! Love your blog and the pillows are such a treat! And, yes, the shade is too… complete with instructions. I finally bought my first dropcloth, washed it, and plan on using it for a bedskirt. Now that is something I haven’t made in a loooong time but I’m ready to make a go of it! I will let you know how it turns out! And I would love to have you drop on by my blog for a visit…. you’re always welcomed! As your newest follower, I will be back again!
Well, as Clint Eastwood said “Hang ’em High!!..and you did…He would be proud!!!…
Beautiful balloon shade!..now with a bit of stitch witchery and your tutorial, I think I can do it!…
I’m terrified of attempting a roman shade, so you’re one step ahead of me on at least attempting one! I think you got just the right amount of poof on this balloon shade – it’s got poof with depth, which is a nice combo. Looking forward to more tutorials! -diane
That looks terrific Linda. Wish I had your talent for sewing – and patience! Love ya work 🙂
Ohh wow! you did a great job. I always wanted to make like this for
our windows cos I want it a little different from the usual curtain
that can buy.thanks for the tips.
I have a confession. I have tried to make these shades twice and failed both times. I couldn’t get them straight. Yours turned out great and I love that you hung it way above the window. Smart girl. :o)
It’s party time over at Debt Free Mommy Blog and you’re invited!! Please stop on in and link up with Making Space Mondays. We look forward to seeing any post(s) about making your space better. Hope to see you there. -Tabitha
I looked all over for how to make these easily, and your tutorial was great! I’m not very good at sewing (I get bored with all the precision required), but these were very easy. It took about 2 hours total to get a set made of pretty embroidered linen hanging in my own tiny bathroom. Thanks for the help!
I am so grateful for the tutorial on balloon curtains. I have looked for some time now to find details and drawings I could understand. Your directions are the only ones I understood.(I’m not a very good seamstress) Thanks for keeping beginners like myself in mind when doing tutorials. I am anxious to start this project now.